Pages

Friday, December 31, 2010

Quilted Table Runner

You will need:
Batting
Coordinating Back Fabric
Strips of Fabric to make the front

This is not simple... but simpler way of making something quilted anyway. You can sew the back, batting, and front strips together all at once! 

1. I laid my fabric on the table and decide how big I wanted to make it. Then I cut it to that size, and then I cut the batting a little smaller then the backing.
2. Lay out all your strips so that you can decide what order you want them to go in. Make a left and right  pile leaving the two middle(ish) strips to be sewed on first.


2. I laid my two middle trips right sides together and pinned it to the middle of my batting and my backing. And sewed down one side.
3. Then open it up and iron it down flat.
4. Pin another strip down right sides together and sew down, then open up and iron down flat.


Repeat until all the strips are sewn down!


Then finish just like any other quilt, sorry I don't trust myself of giving a tutorial for this!

Friday, December 24, 2010

Making your bed in seconds!

I don't know about the rest of you but I hate putting the duvet and the duvet cover back together. You put it in and you're trying to hold onto the edges and shake it all at the same time and if you let go the corner gets lost in the middle.

Maybe its just me and I'm terrible at making the bed, but its just something I don't like! But there is something that makes it so much easier, I finally did this last night. I sewed ribbons on the inside of my cover and then on the outside of my duvet so that you just tie them together. Then shake and the top stayed right where its supposed too!

You'll need:
Duvet and Cover
Sewing machine
Ribbed Ribbon

1. Cut 4 pieces ribbon into 7-8 inch strips and then take a match to the edges to avoid fraying


2. Pin your ribbon into the top corner of your duvet cover. Repeat in the next top corner.


3. Pin your ribbon into the top corner of your duvet, repeat for the next corner.


4. Sew down and make sure to back stitch. I did mine back and forth a couple times so that it was in there strong and tight.


5. Tie your ribbons from you duvet and duvet cover together and then your duvet will never slide down to the bottom while you're sleeping, or Making the Bed!!

The Real Meaning - CHRIST

We all give gifts to our friends, and family but there is a reason we call this holiday {Christ}mas. But what gifts have you given to Christ this month? Although we should be doing things for him everyday and every month this month is a special month where we celebrate Christ.

This month Taylor and I tried to go to the temple more then often, and we also did a fun little door bell ditch. There was a family in our ward that didn't have work this semester and so we gave them a Christmas present, we want to make this our new Christmas Tradition. 


What have you given to Christ this Holiday?
&
Merry Christmas from the Phillips!

Thursday, December 23, 2010

Worthless Women and Men Who Make Them

So this morning I crawled out of ben after sleeping in, my Christmas vacation has finally started which I'm thrilled about - no more answering phones all day for silly rude people! I hoped on my computer and ended up reading this article.

Have you ever thought you stomach was flabby, or your thighs were too big, your eyes weren't pretty enough, your clothes weren't stylish enough. Your arms aren't toned enough, you're not pretty enough, you're not funny enough... That you just not enough? I'v thought all these things in the past two weeks. Needless to say I need a confidence boost, and I got one from reading this article. If you have ever felt any of those things, or anything negative about your self at all read this. It's really long and goes on for a while but even if you just read it for five minutes its powerful and so true.

Tuesday, December 21, 2010

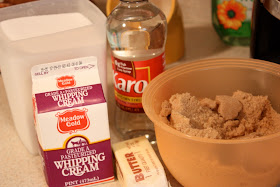
Buttery Carmel Sauce

This stuff is so yummy, I was eating it by the spoon full. Then regretted it, but it was still amazingly yummy, and easy!

You'll Need:

3/4 cup brown sugar
3/4 cup sugar
1/2 cup corn syrup
1/3 cup butter
2/3 cup whipping cream

This will make you about 2 1/2 cups of Carmel Sauce, perfect for dipping apples in, or putting on ice cream, really good on pretzels and its really good on a spoon too!!

1. In a medium sauce pan add butter, sugars, corn syrup. (Everything but the cream!)
2. Cook over medum heat, stirring occasionally, until mixture comes to a full boil, about 5 – 6 minutes.
3. Remove from heat and cool 5 minutes.
4. Stir in whipping cream.
5. Pour into a jar and store in refrigerator. It will thicken when cold.

This stuff is addictive, and amazing! I can't keep out of it!

Sunday, December 19, 2010

Flower Ribbon Shirt

You will need:
A plain shirt you don't wear often
Ribbon
Sewing Machine
Something to make your shirt with (washable)

I had a shirt that was olive green, fits great, modest, makes me eyes pop - but nothing on it, so plain and boring. But a good shirt, so I added some girly flower power to it and now its cute, still neutral and looks great with my favourite grey cardigan.

Forgive my terrible photos, and the fact that you can still see the marker on my shirt!
(Hope it washes out! It was written in Japanese so I couldn't tell) 


First I drew my flower onto my shirt, and then I sewed the flower on roughly the same as the drawing. It was harder then it looked!


Then I sewed the ribbon on to make the flower but slightly off so that you can see the sewn flower, and the ribbon flower. Then wash to get marker, pencil or whatever you used out.


Please excuse my sweats and slippers! I have been really really sick. But I promise it looks so cute with jeans and a cardigan.

I was featered for this shirt over at Flamingo Toes, and I realized that I totally forgot to give her the true credit for this. It was her blog that I got my idea from! Sorry about that

Saturday, December 18, 2010

Christmas Discount

Hey Everyone, due to this being the last two weeks of 2010 and holiday cheer I am doing a sale!
20% off everything in the store, just use the code "DEC2010"
So don't miss out, go check out my etsy store! I do take custom orders, also if you want matching earrings to a necklace they can always be made.


Wednesday, December 15, 2010

Paper Ornaments


Ever girl that walks into our little apartments comments on these adorable paper ornaments!


Our tree when it was done bring decorated!
Light: k-mart
Ornaments: Dollar store, Walmart, and homemade!


Sorry I did not take pictures of the making process but it is so easy, sooo easy! If you've noticed I'v been all about the quickest crafts ever! Although if you plan on making a lot of them like I did it takes a long time.

You'll Need:
Scrap booking paper (Double sided best)
String/thread
Glue
Scissors/Paper cutter

1. Cut your paper. (If its not double sided it will still work, but you can see inside and so it looks much better if there is a pattern/colour inside and outside). You will want to cut a lot of little strips. Half inch wide and four inches long is what I did. You will need six for one ornament.

2. Take your glue (glue gun works best) and two strips of paper. Glue their ends together so that it looks like a circle. 

3. Take you're remaining four pieces of paper and glue them to the top and bottom of your circle to make a round ornament like shown below!

4. Tie you're string or thread on, then hang on tree. Enjoy the compliments!

Note: I feel like this was so simple, that I had a hard time explain it! Once you make one I am sure you will understand what I am saying, they are so easy and cute.


Happy Crafting :)

Saturday, December 11, 2010

Oh, Christmas Tree!


I found the tree I wanted, its tall and chubby!


Our first Christmas Tree! So exciting!


Oh... and we tied the doors shut. We had to crawl through the windows which resulted in some big deep bruises on my leg when the lock stick thing stabbed me! But it was really funny :)


Isn't it just the perfect size, and only $30!

Monday, December 6, 2010

I was the #1 featured on Vintage Pollyanna's blog! Made me so happy. 
Also I wanted to remind all of you that I still have my 15% off in my etsy store up. Just use the code "blackfriday" I will leave that up for a couple more days. I have also put more necklaces! Check out my favourite one here.

Sunday, December 5, 2010

Welcome to Idaho - I dance in a barn!

My Mother put me in Ballet when I was a little girl, then when we loved to a new city I stopped for a little but then started up again at this amazing studio in a town close by. I grew to love ballet, I started pointe, got accepted into the Alberta Ballet summer workshop were I did ballet for 5 hours everyday but sunday for a month. I grew so much in dance and later preformed a pointe solo. I was in love with my pointe shoes. Then I got mono in college had to drop my ballet class and haven't been back since.. Yesterday!

Taylor drove my out to my first ballet class yesterday, it seamed that we were driving out to the middle of a field and he joked that maybe my class was in a barn. Funny right? Well then we pulled up to a barn... we must be lost. I called the dance studio and told them we were lost and she said its in a barn, just go the the side door. Shocked we walked to the side door and opened it, to see a tractor! We walked up this tiny old wooden staircase and sure enough upstairs was a dance floor. These was a women dancing in boots, interesting. I then shed my clothes and put on my ballet slipper. I then understood why she was wearing boots, I thought my toes were going to fall off the floor was so cold.

The class was interesting, and I was dying. I didn't realize how out of shape I had gotten with my year and a half off of dance. I started remember how much I loved ballet and it was a little depressing because I felt silly with how much my dancing had gone down hill since my last competition. This morning I woke up with the sorest body in the world, it's rebelling against me. It hurts, to walk and move my neck and pretty much do anything! Two years ago that dance class would have been a cake walk.

I am now on a Journey to get my dance legs back.


The day I won "Most Promising Dancer Award"


All my Dance girlies and our toes!
My first pointe solo!

Saturday, December 4, 2010

Necklace/Headband Holder

Okay so this is the post I promised all of you a couple days ago. I can't believe it has taken me this long to post a craft, all the ones I have been making lately are for christmas there for unbloggable!

Well if you are all like me I have accessory issues, where do I put all of them! Head bands are a hard to store thing when they have flowers on them, and then with my new necklace venture I have so many necklaces and no place to store them. So I discovered these! 

All you need is:
- Empty Ribbon roll
- paint/or ribbon
- mod podge
- cute paper


1. If you have a brown ribbon roll like this one you want to paint it white. If you have a one one you can leave it, or like shown later I glued some ribbon inside to give it a little more depth and detail.


2. After it is painted cut out a circle. Put a layer of mod podge lay your paper down and press flat. Wait ten minute and put another layer of mod podge down, let dry and your done!

I know its so easy its silly right?


Here are my three I made, I put them up on the wall in our bathroom and hung my necklaces up on it. They also work great for head bands!


If you look past the necklace you can see brown, this is ribbon that I'v put in the inside


On this one it actually has white ribbon inside to add a little something :)
 Personally I love these, I have them up in my bathroom and they are the perfect thing to hold my necklaces and headbands. And everything is from stuff around the house, yay cheap and useful!